I have been the sole full-time photographer for the newspaper in my community for 26 years. In that time, I’ve seen and photographed a lot. There have been a huge number of stories to be told, on every emotional level. The community has come to know and appreciate me, and I am usually welcome. Even on those occasions when the prying eye of my cameras is not welcome, these people mostly know why I have to be there.
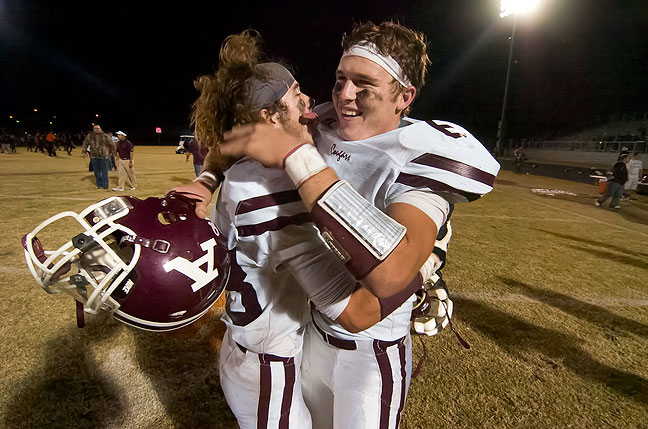
I thought of this last night during a moment when my cameras might be seeing more that my subjects might like, the end of the season for the Ada Cougars football team. In the business, we call these photos “dejection art,” and making these pictures requires some skills. The most important of these is to get the picture while staying out of the moment.
In addition to capturing all these moments, I’ve gotten to know the people, and by this time in my career, I now know the children of the people I photographed when I came here in 1988.
An example is the Jack family. When I started working in Ada, the Cougars were on there way to winning their 14th state championship (they have since won five more), led by a talented running back named Tyler Jack. In 1993, Tyler led Ada’s East Central University Tigers to a national championship. Cheering on the sidelines was Marcy Jeffcoat, who became Tyler’s wife. Tyler became a state trooper, and Marcy now teaches in the Ada City Schools. They have two children, Taryn and Tanner. Taryn started for the Lady Cougars softball team as catcher, and Tanner started this year at center. I’m always glad when I run into any of them, and they are always glad to see me.
Last night I was there to tell another story about the Jack family…
Marcy, Tyler and Taryn comfort Tanner after the Ada Cougars loss to Weatherford in the first round of the playoffs last night at ECU’s Norris Field.
This is the exposure compensation button on a Nikon camera. Different camera companies put it in different places, or embedded in menus, but they all work the same way: letting us fine tune the brightness values of our images. (Don’t mistake this for a similar-looking control near the viewfinder, which is the diopter setting.)This is an image displayed on the monitor of a modern digital camera. The top frame is set to -1.7 exposure compensation, the middle to 0.0, and the bottom is set to +1.7 exposure compensation.
The fundamental look of our images is controlled by many factors: subject, composition, lighting, focal length, color. One element of our imaging that stands out as particularly important is exposure. Our images are made of light, so how much or how little light we show in them is at their heart.
I thought of this for two reasons. First, someone emailed me with an exposure question. Second, I happened across yet another raging debate on Photo.net this morning about “expose to the right,” a hot-button issue regarding exposure in the digital age.
Before we dive into exposure control, let me stridently assert this: exposure, like most factors in photography, is subjective. If anyone every tells you that your opinion about exposure is wrong, they’re wrong. We all have a unique perspective on imaging.
The email I received, however, was a fairly straightforward question from someone just learning about photography: “I think I have sufficient lighting but my pictures come out dark. Any suggestions?”
The answer is, thankfully, a reasonably easy one: learn how to use exposure compensation. Exposure compensation is the way we tell the camera to expose the sensor to more or less light. On many cameras, it is controlled by a button with a +/- on it. We push and hold the button and turn a dial (the main command dial on Nikons) left or right to change the amount of exposure compensation, usually by one third of an f/stop at a time. When you bought your camera, this value was set to 0.0. We can change it to values like +0.7 or -2.3, and so on. Plus makes the image brighter, while minus makes it darker.
Of note is that exposure compensation is usually disabled in “green box” auto mode or scene modes, so to use it, you need to be in one of three exposure modes, P=Program, A=Aperture Priority, or S=Shutter Priority (Canon cameras use Av and Tv for the last two). (See The PASM for more on these modes.) Also, note that exposure compensation has no effect in manual mode, because in manual mode, we pick all the settings.
I intentionally shot this image of a law ornament at “minus 2.3” exposure compensation to illustrate a genuinely underexposed image.This image of the same lawn ornament as above, was made at about +0.3, and looks about right.
I mentioned “expose to the right” earlier, so I should explain: there are those who believe, often very dogmatically, that the histogram (see the image of the display on the back of my camera; the histogram is that thing that looks like little mountain ranges) should be stacked to the right. “Expose to the right” is a worthless tome because it’s only effective some of the time, and treats us as robots who need rules to follow.
In my occupation, news, magazine and sports photography, human faces take priority over other shadows and highlights, so much of the time I try to expose so we can see who, not what.
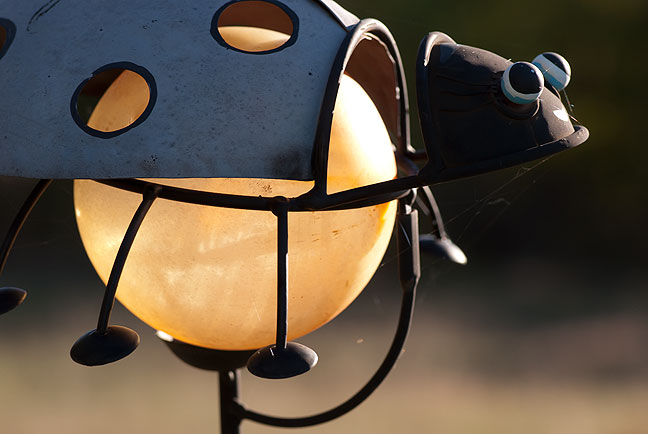
Exposure can make or break certain images, like this wheatgrass at sunset down by our pond this evening. The camera sees the brightness of the sun in the image and might tend to underexpose it, but vigilant use of exposure compensation results in beautiful moments like these.
The “dream team” for the road: the Nikon D7100, the Nikkor AF-S 18-200mm, the Tokina 10-17mm, the iON action camera, and the small, lightweight Slik tripod.
As I have mentioned in previous posts, when I travel, I like to travel light. I also like to be able to accomplish my photographic goals, which are often quite ambitious.
Like many modern Digital SLRs, the Nikon D7100 allows you to automate bracketing. With the self-timer on five seconds and the bracketing set to five frames at one-stop intervals (shown), you can release the shutter and let the camera do the rest.
Earlier this year I was able to cash in some credit card rewards points for a Nikon D7100 and a AF-S DX Nikkor 18-200mm f/3.5-5.6G ED VR II. I took it to the desert in March with quite a bit of success, and it was my main camera on our recent anniversary vacation. After these two week-long adventures, a couple of commercial assignments, using it for teaching, and having it as my primary grab-camera, I now believe that the D7100 with the 18-200mm is an outstanding choice for this type of image making.
As in the desert in March, on the anniversary vacation I partnered the D7100 and the 18-200mm with my Tokina 10-17mm f/3.5-4.5 AT-X 107 AF DX fisheye. I also added our new iON Air Pro™ 3 Wi-Fi action camera, and my small, lightweight Slik tripod. Together, the package is small, lightweight, versatile and fun.
One of my photographic goals on the most recent trip was to photograph Utah’s iconic Delicate Arch in Arches National Park, where Abby and I got married ten years earlier, before and at dawn. Part of this desire was the notion that images of this attraction are becoming stale due to its increase in popularity. I wanted to make images that stood out from the thousands of images made of Delicate Arch every day.
I selected five frames from my sequence, each a different exposure, loaded them into Adobe Bridge, then told Bridge to open them in Photomatix Pro.
I was also mindful that a piece of software I use, Photomatix Pro, was recently upgraded to version 5, which included improvements in image rendering, as well as the addition of a number of presets for creation of High Dynamic Range (HDR) images.
Putting these pieces together, I concluded that I would aim to make images at multiple exposure settings (called bracketing), and use Photomatix Pro to render them into an HDR image, then put the finishing touches on them in Adobe Photoshop. The result achieved what I wanted, a beautiful and unique rendering of an over-photographed icon that has special meaning to my wife and me.
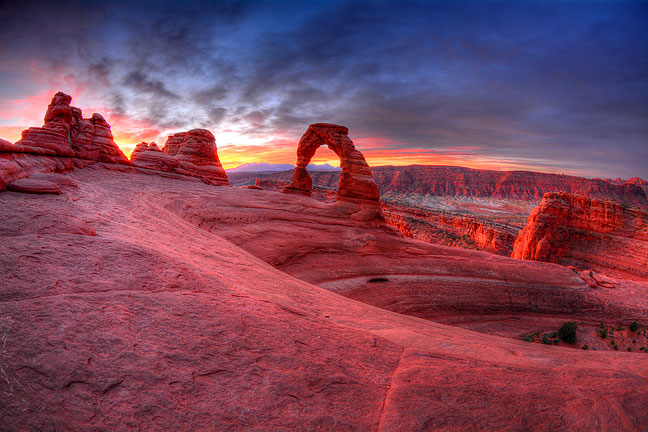
This is the result of combining five exposures using the “enhanced” preset in Photomatix Pro, along with a couple of slight tweaks in Photoshop. The lens for this particular shot was the Tokina 10-17mm. Exposures ranged from one to 16 seconds, all at f/11. I think it is magnificent.One of the key features of HDR is its ability to render the same series of frames of the same scene with a very different look. The frame before this and this image were both made from the same five frames, but rendered with a different “look” in Photomatix Pro.
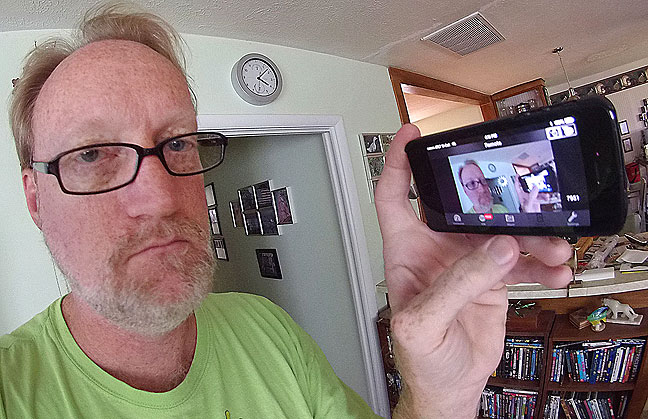
The “action cam,” like this iON Air Pro WiFi 3, is the new king of the selfie.
The marriage of photography and electronic technology is an odd one, and consistently takes imaging to unexpected and unpredictable places.
In the camera phone era, the dominant photograph in the general public’s portfolio is the “hold-away” selfie, so called because the photographer holds the phone as far as he/she can to snap a self portrait or a self-inclusive group photo. The look of these photos got old quickly, in no small part because images of the human face made from within three feet (an arms length) cause a considerable amount of foreshortening (which amateurs often incorrectly refer to as distortion), creating a somewhat unflattering portrait.
You can make hold-away selfies with other cameras, but it’s easier with phones because they are so light, and are usually with us when the good times roll.
Along come action cams. Also known as POV (Point of View) cameras, helmet cams, or the genericization of the brand name GoPro, these cameras feature very light weight, easy mounting on most anything, both video and still capability, and a very wide view angle. The result of this combination is that the photographer can put an action cam on a short stick resembling a hiking pole, and hold it out and up for a marginally better selfie or group than the tired hold-away phone photo.
It’s an improvement over the hold-away selfie, but my feeling is that it will get old quickly, which makes me wonder what the next trend will be.
I photographed this festive group making a “stick selfie” at Arches National Park Utah earlier this month.
Since our newspaper started publishing the quarterly Ada Magazine, and I was named its editor, in late 2007, I have included a feature in it called “Something Beautiful.” Its purpose it to feature an inspiring image of something in our area, either by me, my wife Abby, or from submissions from the community.
“Something Beautiful” has proven to be consistently popular, and at least one other newspaper in our chain has borrowed the idea, with similar success.
In fact, if you live in the Ada, Oklahoma area and have an image you think expresses something beautiful, contact me at richard@richardbarron.net with your image, and I will give it due consideration.
Attached are some of my offerings to Ada Magazine‘s readers.
Winter SunriseMimosa MacroCorporate Headquarters at SunsetSunset and TreesThunderstorm TopsRain TreeSunlight RefractionsKittenSummer Waterfall
When I talk to my students, either in class or in the field, they often ask me about lenses. They already have one, and it’s almost always the “kit lens” that came with the camera, usually an 18-55mm with a variable maximum aperture, like f/3.5 at 18mm and f/5.6 at 55mm. It’s hard to criticize these lenses because they are generally cheap, lightweight, versatile, and sharp. Sometimes the kits include an additional telephoto lens; Nikon offers a small, lightweight 55-200mm f/4-5.6.
The players in today’s comparison are the AF-S Nikkor 18-55mm f/3.5-5.6, and the AF Nikkor f/1.8.
Often my recommendation is a “prime” lens, meaning one that isn’t a zoom, and because most people don’t have much budget, I like to recommend the “nifty fifty,” as it has become known, the 50mm f/1.8. Nikon and Canon both make and sell them, and, like the kit zooms, they are cheap, lightweight, versatile and sharp. But of course, they have a trump card: f/1.8.
Alas, my advice about the 50mm often falls on deaf ears, since it is hard to express, no matter how passionately I make my case, the value of a lens they think they already own in the zoom range of their kit lens.
This morning I decided to illustrate, in a concrete and specific way, why I think the 50mm f/1.8 (or, if you have a big budget, the f/1.4 or f/1.2) is an outstanding addition to any photographer’s bag. I did so by shooting the morning glory in our front yard, first with the kit lens, then with the 50mm f/1.8, both at their largest possible aperture for that focal length.
The comparison doesn’t have a big “wow” factor, as much as it has an “ah.” Ultimately it comes down to your imaging goals, but an f/1.8 might be just the thing to take your imaging to the next level.
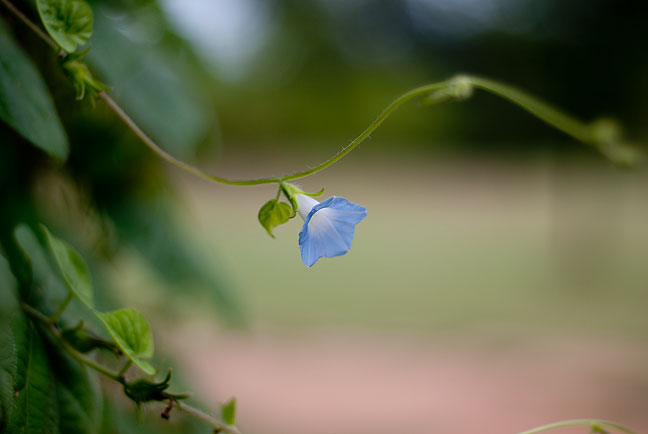
Made with the 18-55mm at 50mm at its largest aperture for that focal length, f/5.6, this image is sharp, but a little uninspiring.This is the same scene made with the 50mm f/1.8, at f/1.8. Note how much more gracefully and elegantly the background elements of the image melt away, giving a better sense for the delicacy of the scene.
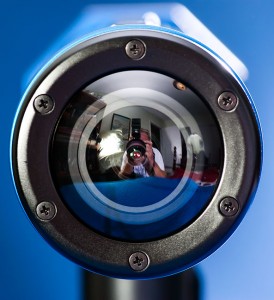
This is a slightly stylized view I made of our iON Air Pro WiFi 3 camera. Experienced readers will recognize the red reflected light on the bottom of the piece as coming from light striking a red blanket I placed at the bottom of the setup.
My wife Abby and I recently used some credit card rewards points to buy a camera know as either a point-of-view camera, an action cam, or a wearable camera. Readers might remember that in May Scott AndersEn and I used his GoPro camera to make some intriguing video imaging; Abby liked what she saw, and I have long thought that I would like to improve a largely unpolished aspect of my photography, filmmaking. Thus began a search for some kind of small, lightweight camera designed for action and point-of-view shooting.
The lens of the iON Air Pro 3 summons memories of the HAL 9000 computer in 2001: A Space Odyssey.
After a bit of research, I found myself drawn to a camera made by iON, the iON Air Pro™ 3 Wi-Fi. Cameras like this are designed to be mounted on cars, airplanes, ski helmets, bicycle handlebars, hiking poles, and on and on.
This particular camera is noted for being waterproof, and for having a couple of key features that led me to purchase it: a slide-switch that activates the record mode which makes the device vibrate to tell the use it’s on, and a WiFi “PODZ” unit that allows me to use an app on my iPhone as a remote control and remote monitor.
The iON Air Pro is equipped with a standard 1/4-inch tripod socket, so it will mount on any tripod, and also includes a tiny flexible tripod, a stick-on helmet mount, a sturdy USB cable, and a number of power plugs for different nations. Additionally, I hopped on Amazon and bought a clamp with a tripod screw so I will be able to clamp this thing to any purchase from drain gutters to the bill of my ball cap.
Point-of-view filmmaking is a slippery slope, and it’s easy to make boring or even offensively annoying videos with it, but my hope it to regard this new device as another tool in the tool box of imaging.
As you can see, this perspective from the iON Pro camera is like a fisheye lens, made so as to facilitate getting shots with the super-wide angle of view without really having to aim the camera. Also in this frame you can see that my iPhone is bunnied-up to the iON and is controlling it and being its monitor.
Shooting football with a wide angle lens requires patience and perseverance, but can provide a sense of intimacy with the action that a telephoto doesn’t.Shot at one of our lesser-lit fields, this image was made at ISO 6400. Despite this, the shutter speed I got at maximum aperture was still long enough that the player on the left is blurry.
A friend of mine requested a “how to” specifically on shooting football.
My newspaper’s coverage area has a very exciting sports scene. Seasons seldom go by without one or more of our teams playing deep into playoffs. The Ada Cougars, for example, have 19 football state championships.
Like much of my news photography (and like many other photographers), I aim for a two-pronged attack: one camera with a wide angle, the other with a big-bore telephoto zoom. I use the big zoom for action, but tend to gravitate to the wide angle for features, since it gives me a fundamentally different look, adding to the dynamics of my product.
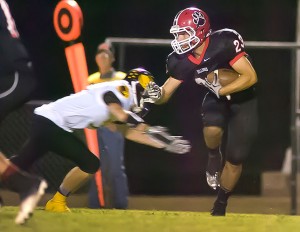
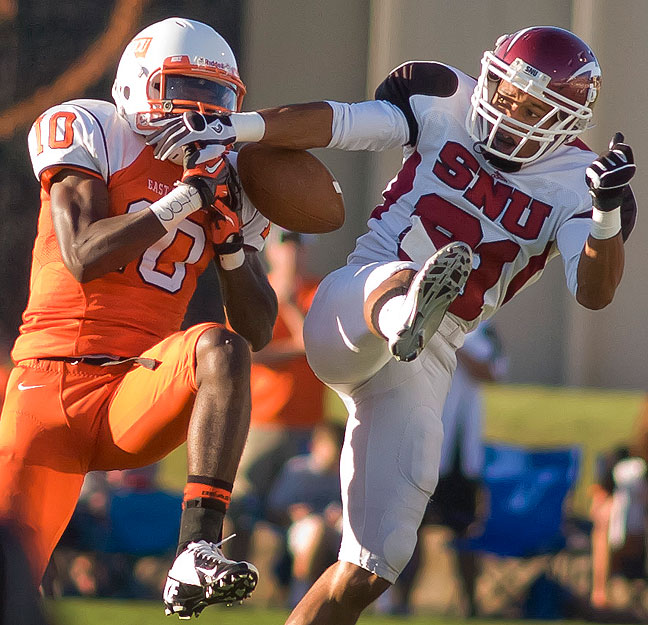
Filling up the frame with the “moment of conflict” is key to shooting any sport.
How do we shoot football?
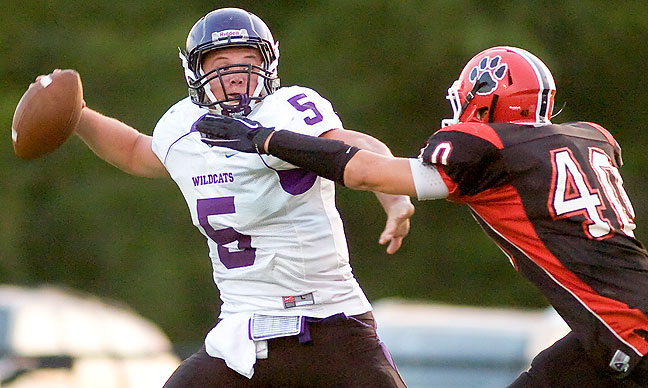
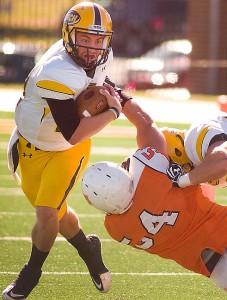
Sports action photos without faces are what we derisively refer to as “body art,” and aren’t as powerful. The quarterback’s face in this image tells an entire story in a single moment.
We need Some Reach. You can’t go onto the field and you can’t control where the players go. With a 24mm x 15mm image sensor (the so-called APS-C size, the most common), a 70-200mm zoom is enough if you use it aggressively. You might be able to sneak by with an 85mm, but you have to be close to the action, and it has to come toward you.
We need f/2.8. Years ago I talked about the value of this large maximum aperture, though I sometimes think this falls on deaf ears. In addition to being necessary to let enough light strike the sensor, f/2.8, particularly at focal lengths approaching 200mm, creates the shallow depth of field that helps isolate the action against sometimes busy backgrounds.
We need High ISO. Most levels of organized football have limited budgets, and they bought all the lights they could, but almost all the time, it’s on the margins. Some tiny high schools have lights that are scarcely brighter than car headlights. Even so, think high, high ISO rather than flash. Nothing takes the depth and spirit out of an action shot like the bland, deer-in-the-headlights look of direct flash.
We Need to Avoid Getting Hurt. You need to be careful and keep your eyes open. 20 years ago in Durant, Oklahoma, a friend of mine and I were shooting a college football game. When the play started coming toward us, I retreated from the sideline, but she stayed put, and got clobbered by two players who totaled about five times her weight. She recovered, but later needed two surgeries on her jaw because of the crash. No image is worth that.
Football is an intense and passionate sport, best expressed in the eyes and faces of the participants.
We Need to Remember the Audience. It’s easy to impress yourself but bore your audience with super-sharp pictures of players running alone in the open field. It’s better to have a slightly soft image that shows moments of conflict and competition. You might be pleased with yourself for getting a shot of a touchdown, but if it’s some kid running away from the camera in the open, you don’t have the shot.
We Need to Keep Our Head in the Game. Don’t worry about finessing focus by moving those sensors around in the viewfinder. The game and the fans move too fast for that. Select the center sensor and put it on your target, and crop later. Also, if at all possible, shoot RAW files and worry about white balance – often whacky under the Friday night lights – later.
We Need to Remember that the Eyes Still Have It. Like all our imaging, it’s not about uniforms or formations, but about the people – their eyes and faces – that matter the most when we are telling their stories.
The lights themselves are one of the characters in the story of nighttime football, as in this image made with a 12-24mm lens.Made with a 300mm lens, this image brings the viewer deep into an intense moment of conflict. Either of these players alone doing the same thing makes for a much less exciting image, re-emphasizing and reaffirming the need to push hard to find the moment and capture it.
Beautiful cumulus congestus clouds reflect in the pond at the Pontotoc Technology Center last night.My students gather to photograph me as I walk toward them in the classic left-right vs front-back motion exercise.
My intermediate/advanced photography students and I had a grand night last night that included several photographic epiphanies and a spectacular performance from the light. Everyone had fun and learned a lot.
Some of the participants in this class, like these three girls, are members of the Byng High School Yearbook staff.We all pose for a group photo on the bridge over the pond at the Pontotoc Technology Center last night. The evening light was outstanding.
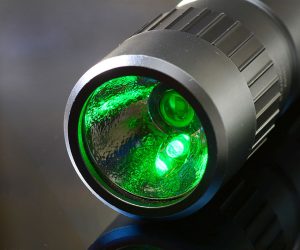
A very useful tool of my trade, the white-red-green selectable flashlight; I got this one on the camping supply aisle.
In Intro to Digital Photography, I teach a lot of basics. I point out the effects of changing this, changing that, changing the other, and how best to take advantage of the result. One thing we discussed recently was shutter speed, and everyone had fun waving their hands in front of each other at 1/8th of a second, then at 1/500th of a second, to get a clearer idea how shutter speed is one key component in building an image.
Since I live in the world of photographing people (mostly) for a living, I tend to come down on the side of faster shutter speeds. Lots of people are fast, from toddlers to professional athletes, and most of the time I try to freeze the action of their movements to illustrate what they are doing for our readers.
One of my students asked me, “Richard, what’s a good shutter speed if I want to show movement?”
It’s a great question with a not-as-great answer: practice. Every time we try to illustrate movement, the scene and subjects are a little different, so my advice is to keep experimenting, but with the notion in mind that in photography, a half a second is a really long time, and a minute is an eternity.
Then, as luck would have it, I was at Ada’s Wintersmith Park recently, looking for a feature photo, which I found (of a young lady doing her daily run up and down the steps of the amphitheater there), and noticed that the lake was high. Sure enough, the stream below the lake was flowing.
Anyone who has tried to photograph running water in daylight has experienced the same frustration: the relatively fast shutter speeds dictated by the brightness of the daytime light create an image that looks wrong. It is neither amazingly crisp, nor does it seem to express how water flows.
Water cascades over stones in the stream below Wintersmith Park’s dam, something of a rarity in July, since the stream is often dry in the summer. Shot with my big 80-200mm f/2.8 at f/4 in aperture priority, the shutter speed was roughly 1/2000th of a second, freezing the movement of the water.The scene of the crime: this angle illustrates the lighting and direction of water flow. The best image of the evening was made on the other bank.
Knowing this, I made a plan to return to the park at dusk. I set up my Nikon D7100 with the AF-S Nikkor 18-200mm zoom on my best tripod as close as I could get without getting wet. I wanted to create as much blur as possible in the swiftly moving water, so I started at 30 seconds at f/22 and ISO 200, but that was entirely too dark. The only number I needed to keep was 30 seconds, so I bumped up to ISO 400 and f/11, and that was just right. The scene was illuminated by fading evening sky through the woods, and orange streetlights on the walking trail. To add an opposite color, I “painted” with my multicolor flashlight set to green.
30 seconds is the threshold exposure for creating really beautiful water blur. Longer exposures create an even deeper “cotton candy” look to the water.
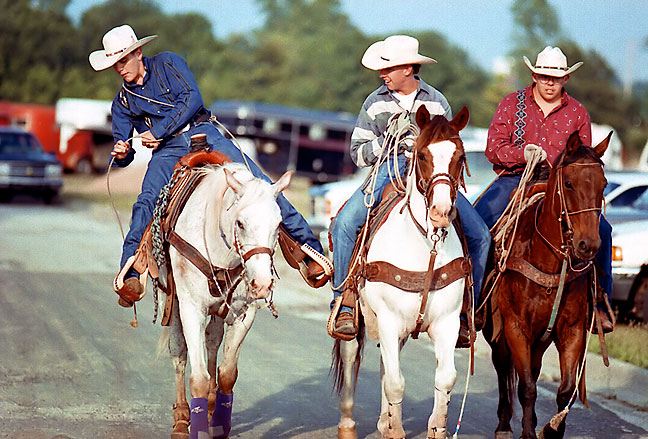
Rodeo cowboys ride into the show arena, June 1996. I found this image while searching my archives for another item, and thought it deserved another moment in the light.
Much of the world around us is driven by economics. Exceptions might be institutions like the Smithsonian or the National Archives, but even they are frequently at the mercy of money. That’s a shame, of course, but it’s a reality.
A member of the “Latta Kittens” t-ball team gets hitting advice from a coach in this June 1996 image. It’s a nice moment, and doesn’t deserve to be forgotten.
In photography, one such reality is that, in the shift from film to digital in the last 15 years, less and less emphasis is placed on film and what we can do with it. I am in no way a champion of shooting on film in 2014, but I am aware that, with film rapidly disappearing from our lives, so disappears what we can do with images that exist on film.
A critical example of this is the Nikon LS-2000, an excellent, fairly-high resolution film scanner with some powerful features. We have one here at the office, and it lives in “the morgue” with a bunch of other obsolete equipment. It’s not obsolete because it doesn’t work. It’s obsolete because Nikon quit updating the drivers for it. And they did that not because there was no longer a need to be able to scan film, but because it wasn’t making money for them any more.
I have a fairly decent flatbed scanner at home, the Canon 9000F. It makes superb scans of prints, but only so-so scans from negatives. I also have an older Epson Perfection 1650 scanner at my office. There are still a few affordable film-only scanners for sale, but only from niche companies. To get a truly solid scan, you need a what’s called a drum scan, and drum scanners are astronomically expensive…
Hasselblad Flextight X5 Scanner: $25,700
Blackmagic Design Cintel Scanner: $29,995
An alternative is sending your film away to be scanned, but honestly, I spend too much time and effort on my photography to have an overworked technician guess at how my images should look.
Pictures we made on film for decades remain a significant part of our imaging lexicon, and it would be wrong to let them sit in the dark in the top of the closet. Get them out, get them organized, and scan while you can.
A black-and-white negative sits in its carrier prior to being scanned at my office recently. Even a mediocre scan with a flatbed scanner can breathe some life into old images.
When I initially approached these guys about taking their picture, they wanted to pose in a big group. I politely explained that it wasn’t what I wanted, and asked them to relax and go about their evening. It took a few minutes for them to do so, but you can see how much better this image is than a group of them posing.
I’m teaching a beginning digital photography class next week, and 12 of the enrollees are high school yearbook students. It’s fun to have enough people in class, because it can energize the room, but I may find it difficult to convey to high schoolers one of my most important messages: storytelling.
It’s easy to make a group photo of troops who are leaving for deployment, but it’s vastly more powerful to photograph a moment like this.
I’ve watched high school photographers at ball games and graduations and class plays and so on, and they almost always fall into the same imaging paradigm: stop the action, get the subjects to grin like apes at the camera, blast away with direct flash, and come away with, essentially, nothing.
So as a high school yearbook photographer, who is your audience? In some very significant ways, you are, only 20, 30, 40 years in the future. What can we offer this audience? If we give them 175 “party pics,” we’ll be doing them a serious disservice, because, as I have discussed before, when you stop a moment to get people to pose for a photo, that photo no longer expresses the moment. It expresses people posing for a photograph, usually predictably and boringly.
I appreciate how hard it might be for a high school kid to say no to, “Hey, take my picture,” or to turn down an opportunity when a bunch of kids are “cheesing” for you. In the smart phone camera era, everyone is conditioned to do that. But I am here to testify: these aren’t the images you want.
Also, of course, is this: you and your friends and everyone else already has hundreds or thousands or tens of thousands of these same boring party pics. If you don’t believe me, do a web image search for “group photos,” and look at how similar the photos look, and how they don’t tell us much about the people and the moment.
After the obligatory group photo when the Roff Tigers won a state championship, there was this moment, which is filled with almost infinitely more emotion.
So if not party pics, Richard, what? Very simply, we are trying to tell a story with our images. Wait for the moment. Watch for it. It’s not before the game when everyone is goofing off. It’s when the three-pointer hits the rim and bounces out at the buzzer. It’s not when the principal and the debate student pose with the plaque. It’s when the debate student is at a tournament, waiting tensely in the lobby to find out if he’ll finish first or second. It’s not when the dignitary hands a check to the student council president and shakes her hand. It’s when she then holds up the check with tears in her eyes and the crowd goes wild for their achievement. It’s not when the football team grudgingly accepts their runner-up trophy. It’s when tears are streaming down their faces with 00:00 on the clock.
Look through the portfolio of any award-winning photographer and you won’t find party pics or group photos. You will find stories. Look at those images, and begin to explore how you can tell your stories.
There are often a lot of photographers making pictures on senior night, in this case Ada Lady Cougar softball, and those photographers want group photos of the families holding their ribbons and roses, grinning their butts off. But this image brings the story home better than any of those photos, that Blakeley Franz was about to play her last high school softball game.
It’s too easy for photographers to get mired in technical details and forget their message: conveying images that describe the moment.
Here is one example…
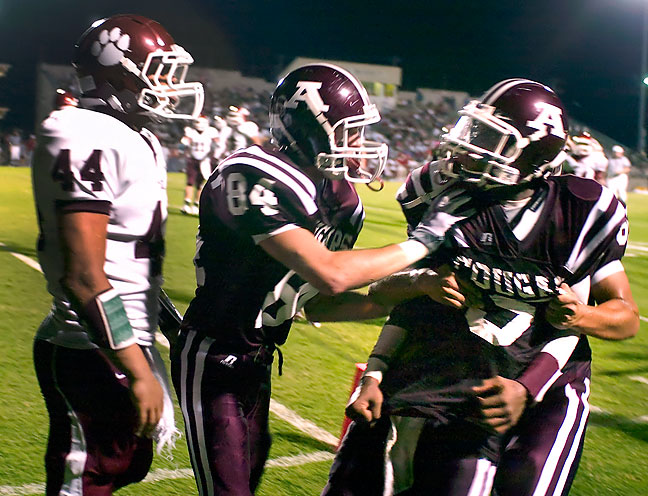
Ada Cougar football players hold their quarterback after words were exchanged with the opposition at the end of a play, September 2008.
If you look at the image above and are inclined to criticize it on its technical merits – noise, blur, color rendition, resolution – you might have lost sight of the true purpose of photography. If you look at this image and see an emotional moment among competitors, there is still hope for you.
or How to Avoid Boring the Audience with Your Wide Angle Lens
Photography is a surprisingly complex visual puzzle. In addition to using a lot of numbers, it is rife with its own jargon: the inverse square law, the exposure triangle, circles of confusion, lighting ratios, the rule of thirds, and on and on.
One excellent use for a wide angle lens is to utilize the directional elements of an image, called leading lines, to draw the viewer into the center of an image, as in this November 2012 high school playoff football game.
One thing I see again and again, and hear described and debated, that is directly related to the geometry of photography, is the misuse of wide angle lenses. Many images that make very poor use of wide angle lenses pass through my hands every day. Not only do I see tons of images shot with wide angles that simply fail to fill the frame with a basic subject (like group photos with the group in the middle of a mostly empty frame), I also see wide angle images that fail to grasp the most fundamental concept in photography: storytelling.
Proper selection of focal length is one of the ways we tell the viewer our story, but it doesn’t end there. Once we have mounted our 18mm or our 85mm or our 300mm, we can’t just sit back and let it do the work. I see a lot of web forum posts with titles like, “What’s the best portrait lens (or wide angle, or telephoto, etc.) for my Camcon 9000?”
The answer is, of course, “that depends.” And it mostly depends on you.
The most important thing you can do with a wide-angle lens – and I can’t emphasize this enough – is use near-far relationships to invite the audience into your image. Without this essential storytelling element, wide angle shots, particularly landscapes, can easily bore the audience.
Here is a very dull photo of some rebar by the side of the road, shot with a 12mm lens. Compare to……same scene, same lens, same exposure, same light, but with a very different result. Essentially, all I did was move.
In the end, the success of your images made with a wide angle or ultra wide angle lens will sink or swim on how you use it. It requires a willingness to give up boring, easy perspectives and work to find ways to tell your story with the lines and angles that are available with these incredible tools.
I continue to be amazed and discouraged that after more than two decades of modern image editing, photo editors and graphic designers still insist on describing images using the term “DPI.” It stands for Dots Per Inch, and it’s kissing cousin is PPI, or Pixels Per Inch, and I am here to tell editors once and for all: DPI and PPI don’t describe image resolution.
The reason this is so discouraging is that imaging professionals should know better. The only number that actually describes digital image resolution usefully is the number of total pixels.
I had an editor ask for a “300 DPI” image just last week. Without any other parameters, a “300 DPI” image could be the size of a postage stamp (1 inch by 1 inch at 300 DPI) or the size of a garage door (270 inches by 180 inches at 300 DPI).
If there’s good news in this miasma of ignorance, it’s that you can easily make a change in the “Image Size” dialog in programs like Photoshop to fool editors into thinking there are getting what they want by simply unchecking the “Resample Image” box and entering “300” in the “Resolution” field. Of course, it doesn’t change the number of pixels in the image, but it satisfies the recipient. They could do it themselves, too, but that may be asking too much.
I’m going to make a point to send this to any and all editors who specify they want a “300 DPI” image.
Behold: same file, same number of pixels, but one says 72 DPI, and other says 300 DPI.